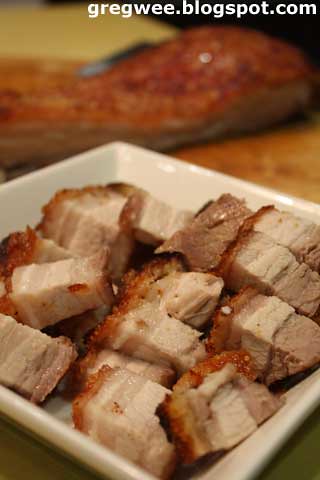
 If you still remember a while ago, my fellow foodie, Jo, got us the meat poking device which is supposedly used to make this dish. Our first try was with a recipe from a Chinese cookbook from some shop. It took us 3 days of seasoning and vinegar rub, then followed by scouring with the device and finally baking on both sides. It should have been obvious to us then cos it didn't turn out as well as we would have liked. First and foremost, after 3 days in the fridge (sounds a little gross now that I think about it), it is just impossibly non-pokeable. So our crispy pork turned out crispy in some parts & flat in the other areas. The crispy part did not stay light crispy for long as well. Eversince then, this dish has been so elusive to me.
 I tried the same method another time with one day chilling and it didn't work either. If you know what siu yuk is all about, it has to be so tasty that the pork fat and meat just blend together as you bite into it and the skin, oh myyyy is the highlight, should be crispy, crackling yet light. If you can hear the lond crackling in your head as you bite, then that is tough crackling not light crackling. I would say this is easily the best best way of eating pork belly. The best of course can be found in Hong Kong normally. I have not been able to find a match in Kuching, except maybe Mr. Ho's Fine Food.

And then, last week, lightning struck. I thought of trying out a new method (poke first, seasoned, chilled overnight to dry and poke again to be safe and roast), so I ordered my pork belly and tonight, my dear readers, is SUCCESS! I was ecstatic about 3 hours ago & still am. My crispy pork turns out almost perfect (pardon the less than modest attitude). But seriously, if Hong Kong is 10, mine is 8.5-9 because there is one little section twice the size of a 50cent coin which didn't puff up well. Other that that, all is crispy light and tasty. And it was still crispy after it came out of the oven for 45 min later for dinner. Will check again tonight. If it's still light crispy then I will award myself with the 9. To Greg it was perfect because I gave him the perfect section. Our friend, Chiang Hon came over to pick up a cake and he tried it, loved it, took a picture of it. Mind you, he claims that he normally does not eat fatty pork.

I remember Terri did a crispy pork post too. I double checked my method with hers and picked up one very important tip. Chuck it in the oven and let it bake for almost one hour & I did just that, closed my eyes and prayed for the best. And it worked.
So here it is, Nee's Crispy Pork:
1.2 to 1.5 kg of pork belly
1) Order one nice slab of pork belly. It's a little difficult to buy slabs off the rack in the market. I ordered mine from Butcher's Deli, Stutong. They are pricey but they know what I was talking about and gave me a good piece with even layers of fat and meat. This is important because if the belly has too much meat or fat, the result in term of taste and roasting will not be good.
2) Clean it well. Wipe it dry and start poking and scouring the skin layer. Really POKE! Imagine your worst enemy while you are at it. I pressed the skin with that poking device, a fork and a carving fork till tiny holes can be seen all over. Scour it too. My maid helped half way through. Don't underpoke!
3) Turn it over to the meat side. Scour the meat lightly. Season with 1 tbsp of salt, 1 teasp of black pepper and 1 teasp of five spice powder. Bring the seasoning up to the top skin layer as well. Pat skin dry with some kitchen towel and apply 1 tbsp of white vineger and rub all over the skin layer.
4) Place on a baking dish. Keep it in chiller overnight, uncover to dry the skin and let the seasoning seep in.
5) Turn up oven to highest, my oven is 250 deg cel, non fan. Place the rack on the higher part of the oven, nearer to heat. Chuck the meat with the baking dish into the oven and roast for 1 hour to 1 hour 15 min if your meat is bigger or till the meat looks dry and puffy. Check at half an hour to let out smoke (i was worry about setting fire in my oven) and turn the baking dish around for more even baking. Cool slightly before cutting. Serve with pickled chillis and soya (Greg thought this wasn't necessary at all. He ate it just like that).
For that little part that does not puff well, my theory is:
1) the area is slightly underpoked or
2) not dry enough or
3) that section was slightly concave so the wetness actually flowed and contained in that area during baking and hence making it slightly underpuffed.
To the experts out there, please advice! Anyone? A Terri, Ganache? I saved that little section by pan frying the skin side down. Well, it turned out crispy as well, albeit a little different kind of crispy, more like frying crispy, not puffing crispy. Better than wasting it rite?!


